This is not really tech related... but I enjoy PostSecret. So when my friends started linking me to my buddy's new parody blog, PostRejects, I was dying of laughter. Take a look. I figured I'd post it here in the hope of adding a small smidgen of traffic. Right now it hasn't been indexed by the big G yet, so maybe this'll help a bit. Also check out the facebook group!
The main site:
http://postrejects.blogspot.com
Facebook group:
http://www.facebook.com/home.php?ref=logo#/group.php?gid=34825872689
Thursday, November 13, 2008
Tuesday, April 15, 2008
Vista Eats Mac!
This is *hopefully* protected under parodys and such... but i was fiddling around with Paint.NET today and threw this wallpaper together. It's native 1680x1050 resolution if you go to my Picasa page (because that's what my desktop works at).
Me and my roommate have been on an unusually strong anti-Mac kick lately, and I was really looking for a wallpaper that said "I like Vista more than Macs/OSX." So here it is:

Me and my roommate have been on an unusually strong anti-Mac kick lately, and I was really looking for a wallpaper that said "I like Vista more than Macs/OSX." So here it is:

Monday, April 14, 2008
Close all but active window in windows. CloseOtherWindows Version 0.1
Since I discovered tabbed browsing, I tend to open all sorts of tabs and eventually end up with like 20 open. Then when I realize I no longer I need any of them, I right click the first one and choose "Close Other Tabs"
I end up with a lot of Explorer / Firefox / Foxit Reader / Word windows from time to time when studying or manipulating lots of files, and thought it would be really convenient to have the same functionality in windows. I've written an Autohotkey script that will identify the type of the active window, find the IDs for all the other windows of that type, and then close them all out. It seems to be working really smoothly on my machine. Feel free to download the first version of the CloseOtherWindows script here:
CloseOtherWindows Version 0.1
I've hotkeyed it to Alt+F3, but you can change this if you'd like. I thought Alt+F3 was a good choice beign that it's a similar hotkey to Alt+F4 (close active window) but with a different purpose. Let me know if you've tried the script and give some feedback, good or bad!
Friday, February 29, 2008
Rock Band Drums - Modded Double Pedal (Real!) and New Drumset
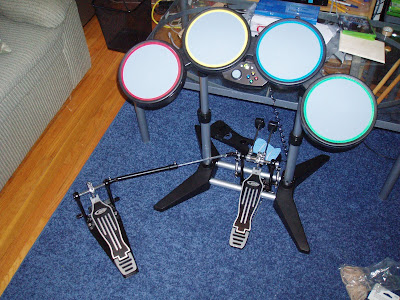
Me and my roommates play Rock Band together. A lot. We don't always have a signer, but 3 of us play together consistently on expert. So, it's always a tough time when some of the equipment fails--and it does fail when playing on expert. This past month has been a rough month for our drum set, but it's now better than ever thanks to EA's warranty and a little bit of creative modding on the part of me and my roommate.
At the end of January, my roommate came in and told me that the drums were broken. Really broken. I went to take a look and found that we had 3 cracked drum pads, one of which had the drumstick completely blow THROUGH the pad. We'd all drummed hard on the pads, but we had to in order to get the strikes to register. So, I got an RMA and they 2 day aired a new set to me.
When that set showed up, we found that there have been some major improvements since our original set was constructed. The drum pads are now thicker (probably due to people cracking them like we did). They're now sensitive enough to pick up light tapping, which makes drumming a lot quieter and easier.

The new set did wonders for our drumming.... and then last week our drum pedal snapped.

I had heard of various people modding their drum pedals, and figured that since ours was broken we may as well give it a try before RMAing. One involved replacing/reinforcing the plastic pedal plate with metal. Apparently it's actually a business! While an interesting concept, I figured that was kind of a waste of money when I could just send back for a new one. Then I found a method for transforming a real drum pedal into a rock band pedal. Me and my roommate agreed that we definitely needed to try that. Headed out to the stores and managed to find a used double pedal at Guitar Center for $60 (a steal considering that new double pedals retail for well over 100 dollars).


As you can see in the above picture, the beaters have been adjusted to swing down to hit a horizontal surface, instead of how they would strike a conventional drum. I was going to show how we did that, but my roommate was a little overzealous and disassembled everything before I got to take a picture. Conventional drums allow the pedal to attach to the structure, but sadly the rock band drums are not designed in such a manner. This is a problem because the pedal needs to be kept stationary. After an hour or trying to get the pedals and drum set attached to plywood, we changed strategies and bought a rug for the living room (we needed one anyway) and used the velcro under the left pedal to keep it in place. I managed to hold the right pedal in place by assembling the drum set through the pedal itself. Works like a charm.


The original real pedal mod clued me into the fact that there is a small magnet underneath the pedal that triggers a switch in the base. He went through the process of removing the magnet and embedding it in an old beater, but had some difficulty getting it aligned with the reader. We opted to use two larger magnets (one for each beater of the double pedal) and tape them with electrical tape to the beaters.

We found that the large magnets combined with placing the base sideways allowed the twin beaters to each trigger the magnetic switch. The only caveat, is that because it is triggered by the magnet, you can't rest your foot on one pedal while striking with the other. It's a minor inconvenience which we're hoping to fix in the future by replacing the magnet circuit with a custom built vibration sensing circuit. (Just waiting on involvement from one of our electrical engineering friends) I then mounted a sponge to the top of the base with double sided tape and rubber bands. This quiets the strikes and prevents the beaters from cracking the base.

The result is a very clean looking mod that makes drumming awesome! The new pedal setup definitely is more accurate and easier to hit than the original was. I'll be playing Rock Band like this from now on!
Thursday, February 14, 2008
Show / Hide Pidgin Buddy List
I had been looking for a way to easily show and hide the Pidgin buddy list via a keyboard shortcut. My instinct was of course to use AutoHotkey. It turns out AHK has some issues with manipulating things in the system tray, where Pidgin resides when I close the buddy list. I got around this by having the AHK script call up the Pidgin executable file again. Pidgin is smart enough to know it is already running, and will simply call up the buddy list to the front. If the buddy list is already up, the script closes it. I tied this action to Win+B. Here's the code I used:
;----Pidgin buddy List Show/Hide
#B::
IfWinActive Buddy List
{
WinClose Buddy List
} else {
Run "C:\Program Files\Pidgin\Pidgin.exe"
}
Return
;----Pidgin buddy List Show/Hide
#B::
IfWinActive Buddy List
{
WinClose Buddy List
} else {
Run "C:\Program Files\Pidgin\Pidgin.exe"
}
Return
Wednesday, February 6, 2008
Disable "All Downloads Have Completed" Popup in Firefox
The Firefox "Downloads have completed" popup is nice, but it's been getting in my way a bit when trying to access window controls as the downloads complete. Here's how to disable the popup:
1. Open about:config. If you don't know what about:config is, it's the way to get at the nitty-gritty Firefox settings that aren't in the default options boxes. go to your address bar and type in about:config and then hit enter. This will bring up a huge list of variables.
2. Find the variable for browser.download.manager.showAlertOnComplete
3. Double click the variable to change its value to false
4. Restart Firefox
Saturday, February 2, 2008
Dismantling WD Essential Edition 500GB External HD

Recently ran into the situation where a friend of mine had a Western Digital Essential Edition 500GB External Hard Drive that died after a couple months of use. He'd plug it in and try to power it on, but the thing wouldn't fire up. Called WD, and was told it was under warranty, but he had a couple hundred gigs of data on it that he didn't want to lose. Data recovery -- even though it seemed likely the drive inside was still fully intact -- would run him upwards of $1500. Looked to me like the power supply was just dead, so we decided to forget the warranty and crack open the enclosure to see if we could get the data off. Turns out there is a standard SATA 500GB drive inside the enclosure with model # WD500AAKS.
What you will need:
1. Dead Western Digital Essential Edition External Hard Drive that you think has a dead power unit but a functional drive.
2. Some screwdrivers
3. A 3.5 inch SATA enclosure or a computer with a free SATA port and SATA power supply (to get your data)
What follows is the procedure we used to dismantle the external enclosure. THIS WILL VOID YOUR WARRANTY!!!! Only dismantle your drive if you feel the value of trying to get your data easily off the drive (and netting a 500GB internal SATA drive) is worth more to you than getting a new drive from WD under warranty. This procedure is provided as a guidance if you want to try this so that you aren't going in blind. Don't blame me if your drive itself turns out to actually be dead, or you break the drive during this process!
First, you will need to scrape off the gunk that they've used to seal the main case screw on as shown in the picture. (The gunk is what tells them whether the case has been tampered with or not). Undo this screw in the upper right corner of the drive.

The next step is to get the hard drive and it's "pages" removed from the "binding" of the book. Use a flatheaded screwdriver or some other flat device to get under the edge of the exterior edge of the "book." You'll need to go around most of the perimeter to get all the tabs undone. This will require a little bit of force! When you're finished, you'll be left with :

Now the hard drive is just held in by its cabling and the 4 large screws that go into its sides. (In the following pictures, the 2 exposed ones have already been removed... I got overzealous!) Problem is, the "pages" of the MyBook prevent easy access to two of the screws with a screwdriver. So, the next step is to get the black plastic pages detached. Looking at it from the hard drive side down, you will see 4 screws going into the metal, and then into the plastic Two of them are visible in the picture below; the third is behind my thumb, and the 4th is concealed by the hard drive off to the right.

With these screws gone flip the drive and its case over and remove the main circuit board. You'll need to remove 4 more screws, and then pry the black plastic around the USB port.

After the main board is detached from the front board (the front board is what once sat behind the main power button on the drive) we need to remove the 2 screws attaching it to the black plastic. These screws are the aligned upper 2 in the picture below.

With these screws out, you should be able to easily remove the black plastic pages of the MyBook. With that piece gone, detach the main board's power and SATA connectors from the drive. (This cable is under the silver foil)

You'll just be left with a little more casing, which you can now easily remove by detaching the 4 screws attached to the sides of the drive.

You're done! Now just attach the drive to your functioning computer or enclosure. Shut down first and be careful inside your case, etc. and copy the data to a new drive or just leave the drive in as permanent extra storage.

Monday, January 28, 2008
Remove username from Vista welcome / logon screen
For the first time on a Vista machine I found that I had a need for multiple user accounts, even though one of those accounts is only for secure logins to shared drives and remote desktop from one machine to the other. As a result, I never need to directly log in locally and never need to see that username on my login screen. I'd much rather just type in my password and go.
Googling, I found that the same registry key that allowed for this change also works in Vista, the key just doesn't exist. If you don't feel like messing about in the registry, here's the registry key (open notepad, paste in the text below, and then save it as a *.reg file instead of *.txt)
[HKEY_LOCAL_MACHINE\SOFTWARE\Microsoft\Windows NT\CurrentVersion\Winlogon\SpecialAccounts\UserList]
"username"=dword:00000000
Subscribe to:
Posts (Atom)